


Making contributions
You’ve received this error message because you’ve tried to upload contributions data for a schedule when it is already being processed to cover the same earnings period. We’ll send a message to your Nest secure mailbox once it has been processed successfully and the amounts are updated in the contribution schedule. You’ll then need to authorise the payment by clicking on ‘Submit schedule’ for paying the contributions.
If you’ve uploaded the file and then want to make correction to the amounts, you’ll need to wait for the file to get processed. Once the file is processed and the members are appearing in the contribution schedule, you can upload the file again and we’ll overwrite the previous records. You can then click ‘Submit schedule’ to pay the contributions. The system will calculate the difference between what was previously paid for each member and what you have told us you want to pay now. If you pay by Direct Debit it will collect any positive difference it has calculated. If the sum of all the changes results in a refund we will notify you of the refund and pay the amount into the employer’s nominated bank account.
Please ensure all mandatory fields are completed. You can find all the mandatory fields in section 4.5, page 69-76, in our Employer payroll guide.
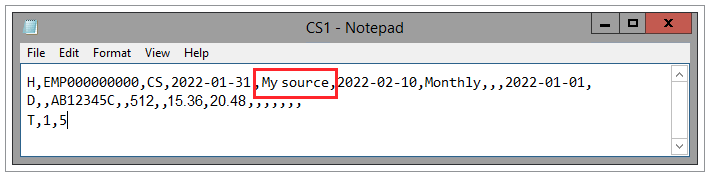
The payment source name you’ve entered is incorrect. Either the payment source doesn’t exist or the name has been entered in the wrong case. Please ensure that the payment source name on the file is exactly the same as it is on your account. For example, if the name of the payment source is ‘My source’ on your Nest account and if it’s entered as ‘My Source’ in your file, the system will not accept it. You can check the details from ‘Manage payment sources’ of your Nest account.
Follow the below steps to change the payment source name:
- Right click from your mouse on the file you want to upload, click ‘Open with’ and select ‘Notepad’.
- You’ll need to update the name of the payment source in the first row which starts with H.
- Update the name of the payment source as it appears on your Nest account.
- Then click ‘File’ and select ‘Save as’, enter a new name for the file and add ‘.csv’ in the end.
- Once the file is saved, go to your Nest account and upload the file again.
Making contribution – invalid date
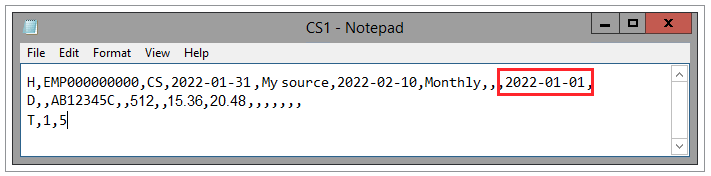
The earnings period start date you’ve entered is either incorrect or in the wrong format. Please check and enter a valid date in the format YYYY-MM-DD. For example, if the earnings period start date on your Nest account is 01 January 2022, you’ll need to enter it as 2022-01-01. To check the earnings period start date, click 'Manage contributions' on your homepage. You’ll be able to see a list of contributions schedules and the date will appear below Earnings period.
Follow the below steps to change the earnings period start date:
- Right click from your mouse on the file you want to upload, click ‘Open with’ and select ‘Notepad’.
- You’ll need to update the earnings period start date in the first row which starts with H.
- Update the earnings period start date in the YYYY-MM-DD format.
- Then click ‘File’ and select ‘Save as’, enter a new name for the file and add ‘.csv’ in the end.
- Once the file is saved, go to your Nest account and upload the file again.
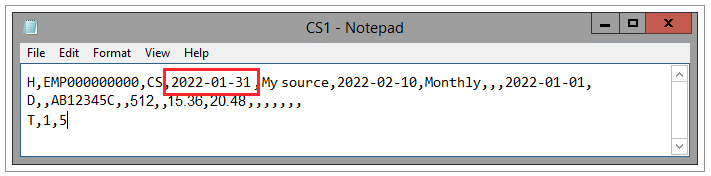
The earnings period end date you’ve entered is either incorrect or in the wrong format. Please check and enter a valid date in the format YYYY-MM-DD. For example, if the earnings period end date on your Nest account is 31 January 2022, you’ll need to enter it as 2022-01-31. To check the earnings period end date, click 'Manage contributions' on your homepage. You’ll be able to see a list of contributions schedules and the date will appear below Earnings period.
Follow the below steps to change the earnings period end date:
- Right click from your mouse on the file you want to upload, click ‘Open with’ and select ‘Notepad’.
- You’ll need to update the earnings period end date in the first row which starts with H.
- Update the earnings period end date in the YYYY-MM-DD format.
- Then click ‘File’ and select ‘Save as’, enter a new name for the file and add ‘.csv’ in the end.
- Once the file is saved, go to your Nest account and upload the file again.
The earnings period end date you’ve entered is incorrect. Please check and enter a valid date in the format YYYY-MM-DD. For example, if the earnings period end date on your Nest account is 31 January 2022, you’ll need to enter it as 2022-01-31. To check the earnings period end date, click 'Manage contributions' on your homepage. You’ll be able to see a list of contributions schedules and the date will appear below Earnings period.
Follow the below steps to change the earnings period end date:
- Right click from your mouse on the file you want to upload, click ‘Open with’ and select ‘Notepad’.
- You’ll need to update the earnings period end date in the first row which starts with H.
- Update the earnings period end date in the YYYY-MM-DD format.
- Then click ‘File’ and select ‘Save as’, enter a new name for the file and add ‘.csv’ in the end.
- Once the file is saved, go to your Nest account and upload the file again.
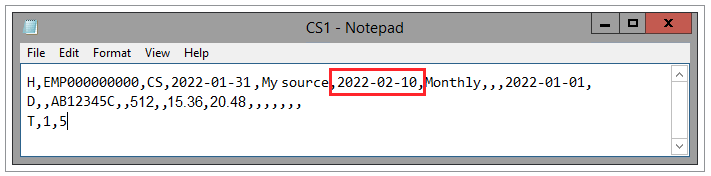
The payment due date you’ve entered is either incorrect or in the wrong format. Please check and enter a valid date in the format YYYY-MM-DD. For example, if the payment due date on your Nest account is 10 February 2022, you’ll need to enter it as 2022-02-10. To check the payment due date, click 'Manage contributions' on your homepage. You’ll be able to see a list of contributions schedules and the date will appear below Payment due date.
Follow the below steps to change the payment due date:
- Right click from your mouse on the file you want to upload, click ‘Open with’ and select ‘Notepad’.
- You’ll need to update the payment due date in the first row which starts with H.
- Update the payment due date in the YYYY-MM-DD format.
- Then click ‘File’ and select ‘Save as’, enter a new name for the file and add ‘.csv’ in the end.
- Once the file is saved, go to your Nest account and upload the file again.
Making contribution – invalid member details
When you upload the contribution schedule we check the member’s National Insurance (NI) number in the file against their account and if we can’t find a matching NI number within the active workers on the employer’s account, we’ll check the Alternative Identifier. You’ll get this error message if:
1. The NI number or the Alternative Identifier do not match those of any active worker on the employer’s account
You’ll need to check the member’s NI number and the Alternative Identifer from the ‘Manage workers’ tab of your Nest account. If either is incorrect on the Nest account, you’ll need to update it from the ‘Manage workers’ tab.
If you can’t find the member in the active workers list, they might not be enrolled in the scheme. You can enrol them and then upload the contributions file.
2. The NI number or Alternative Identifier does not match with our record
You’ll need to check the member’s NI number and Alternative Identifier in the contribution file, update the correct details and then upload it from the ‘Manage contributions’ tab.
Follow the below steps to change the NI number or Alternative Identifier in the file:
- Right click from your mouse on the file you want to upload, click ‘Open with’ and select ‘Notepad’.
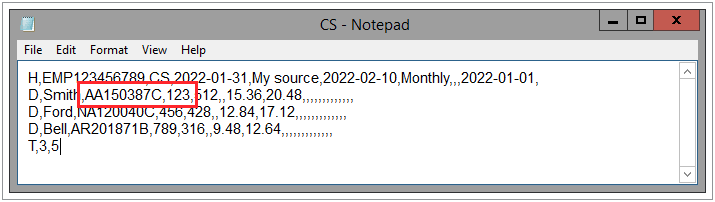
- You’ll need to update the NI number or Alternative Identifier which appears next to the member’s last name as shown in the below image.
- Update the NI number or Alternative Identifier as it appears on your Nest account.
- Then click ‘File’ and select ‘Save as’, enter a new name for the file and add ‘.csv’ in the end.
- Once the file is saved, go to your Nest account and upload the file again.
You’ll need to check if the worker is enrolled and showing in the active worker’s list on your Nest account. To check this, click ‘Manage workers’ on your Nest home page. If you can’t find the member in the active workers list, they might not be enrolled in the scheme. You can enrol them and then upload the contributions file.
If the worker is already appearing in the active worker’s list but belongs to a different group or payment source, they’ll be aligned to another contribution schedule. You’ll need to update the contributions for the worker in the correct contribution schedule.
Please check if the worker is enrolled and appearing in the active workers list on your Nest account. To check the details, click ‘Manage workers’ on your Nest homepage. You can then view the active workers. To see if the worker has opted out or their enrolment is cancelled, click ‘View inactive workers’. If the worker is not enrolled, you will need to enrol them online and then upload the file again.
Making contributions – invalid amounts
You’ve received this error message because you’ve entered information that’s either incorrect or doesn’t match the settings of the group this member is in. You’ll need to check the following by clicking ‘Manage groups’ on your Nest home page:
- the member’s earnings you’ve entered are in line with the earnings basis set up for this group
- the contribution amounts you’ve entered are in line with the contribution rates set for this group
- the contribution amounts are in line with the maximum contribution limits, if you have set these, for this group - contribution amounts must not go above this
If you want to pay contributions which is more than the maximum amount you’ve agreed to pay, you can submit it by creating an exception schedule.
You’ve received this error message because you’ve entered information that’s either incorrect or doesn’t match the settings of the group this member is in. You’ll need to check the following by clicking ‘Manage groups’ on your Nest home page:
- the member’s pensionable earnings you’ve entered are in line with the earnings basis set up for this group. If the earnings basis is qualifying earnings you’ll need to deduct the lower threshold from the total pay, and where relevant not include any earnings over the upper threshold.
- the contribution amounts are in line with the minimum contribution rates set for this group - contribution amounts must not go below this.
You’ll also need to check and, if required, edit the worker’s tax relief eligibility status.
If the worker is not eligible for UK tax relief then we’ll expect the full contribution. For example, if the worker’s gross contribution rate is 5% we’ll expect this instead of 4% (I.e. 5% less 20% tax relief) for tax relief eligible workers.
Go to the ‘Manage workers’ area of your account and locate the member’s record. Click on view/edit and check that ‘Eligible for UK tax relief’ is marked as ‘Yes’. If not and the worker is eligible for UK tax relief on their contributions you can change the eligibility to Yes.
Once the tax eligibility status is updated, you can go back to the contribution schedule and submit the contributions.
Please check the value entered has no more than two numbers after the decimal point for the amounts updated for pensionable earnings, employer contribution and member contribution. For example, £2.99 not £2.993. To update this, click ‘Manage contributions’ on the home page. Then click the arrow below ‘Edit/Pay’ next to the contribution schedule and enter the correct value in the relevant boxes next to the member’s name.
Making contribution - contribution correction
If you’re making correction to a paid schedule, you can only correct the contribution amounts and not the reason selected for making the payment.
To make correction to the contribution amounts click ‘Manage contributions’ on your Nest homepage.
Then click ‘Paid schedules’.
Click the arrow icon below View/Edit next to the schedule you want to correct.
Click the pencil icon next to the member’s name and enter the correct amount in the relevant boxes.
Once done click ‘Save changes’ and then click Submit schedule’.
For more information please see How do I correct a schedule I’ve already paid?
If there are contributions to be paid for a worker for whom zero contributions were submitted with reason as ‘Member has insufficient earnings’ or ‘No further contributions payable’, then you’ll need to pay them from an exception schedule.
You’ll get this error message if you’re trying to correct a locked member record through file transfer or file upload.
Member records within the contribution schedule are locked 23 months after the earnings period end date, or the date the schedule is generated in case of an exception schedule.
To unlock these schedules, you’ll need to send us evidence by post.
Making contribution – exception schedule
Please ensure you’ve added the correct members to the exception schedule as per their opt-out rights. Members with enrolment type as ‘Auto enrolled’ or ‘Opt-in’ would have had opt-out rights and all others would be without opt-out rights. To find the member’s enrolment type, click ‘Manage workers’ on the Nest home page and then view it under Enrolment type next to the member’s name. If the reason you’ve selected is incorrect, you’ll need to create a new exception schedule with the correct reason.
The generation date is the date that the exception schedule was created. Please check the details of the exception schedule online and correct the generation date in the file header in the format YYYY-MM-DD.
To check the generation date, click ‘Manage contributions’ on your Nest homepage and then click ‘Exception schedules’. You can then view the date below Generation date.
Follow the below steps to change the generation date:
- Right click from your mouse on the file you want to upload, click ‘Open with’ and select ‘Notepad’.
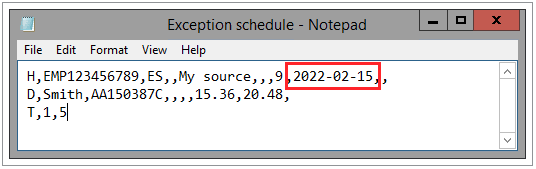
- You’ll need to update the generation date in the first row which starts with H.
- Update the generation date to match with the date on your Nest account.
- Then click ‘File’ and select ‘Save as’, enter a new name for the file and add ‘.csv’ in the end.
- Once the file is saved, go to your Nest account and upload the file again from the exception schedule that is created.
The generation date is the date that the exception schedule was created. The date you’ve entered is either incorrect or in the wrong format. The format should be YYYY-MM-DD.
To check the generation date, click ‘Manage contributions’ on your Nest homepage and then click ‘Exception schedules’. You can then view the date below Generation date.
Follow the below steps to change the generation date:
- Right click from your mouse on the file you want to upload, click ‘Open with’ and select ‘Notepad’.
- You’ll need to update the generation date in the first row which starts with H.
- Update the generation date to match with the date on your Nest account.
- Then click ‘File’ and select ‘Save as’, enter a new name for the file and add ‘.csv’ in the end.
- Once the file is saved, go to your Nest account and upload the file again from the exception schedule that is created.
Please ensure the reason entered in the file header matches the reason entered while creating the exception schedule. To check the reason, click ‘Manage contributions’ on your Nest homepage and then click ‘Exception schedules’.
Below is the list of digit code and reasons that you can select in the CSV file.
| 1 Payment of a shortfall of minimum contributions for a previous tax year (member without opt-out rights) | 2 Payment of a shortfall of minimum contributions for this tax year (member without opt-out rights) |
| 3 Payment not covered by a contribution schedule for a previous tax year (member without opt-out rights) | 4 Payment not covered by a contribution schedule for minimum contributions for this tax year (member without opt-out rights) |
| 5 Payment not covered by a contribution schedule for excess contributions for this tax year (member without opt-out rights) | 6 Payment of a shortfall of minimum contributions for a previous tax year – (member with opt-out rights) |
| 7 Payment of a shortfall of minimum contributions for this tax year (member with opt-out rights) | 8 Payment not covered by a contribution schedule for a previous tax year (member with opt-out rights) |
| 9 Payment not covered by a contribution schedule for minimum contributions for this tax year (member with opt-out rights) | 10 Payment not covered by a contribution schedule for excess contributions for this tax year (member with opt-out rights) |
| 11 Payment by Insolvency Practitioner/Official receiver for current tax year (member without opt-out rights) | 12 Payment by Insolvency Practitioner/Official receiver for a previous tax year (member without opt-out rights) |
| 13 Payment by NIF for current tax year (member without opt-out rights) | 14 Payment by NIF for a previous tax year (member without opt-out rights) |
| 15 Payment by Insolvency Practitioner/Official receiver for current tax year (member with opt-out rights) | 16 Payment by Insolvency Practitioner/Official receiver for a previous tax year (member with opt-out rights) |
| 17 Payment by NIF for current tax year (member with opt-out rights) | 18 Payment by NIF for a previous tax year (member with opt-out rights) |
Follow the below steps to change the reason for exception schedule:
- Right click from your mouse on the file you want to upload, click ‘Open with’ and select ‘Notepad’.
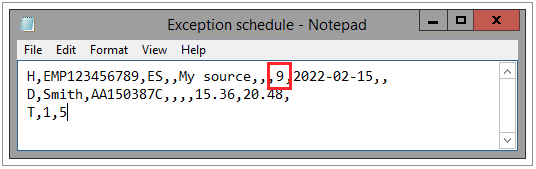
- You’ll need to update the reason in the first row which starts with H.
- Update the reason by selecting the number as shown in the table to match with the reason selected on your Nest account. For example, if the reason on your Nest account is ‘Payment not covered by a contribution schedule for minimum contributions for this tax year (member with opt-out rights)’ you’ll need to enter the number as 9.
- Then click ‘File’ and select ‘Save as’, enter a new name for the file and add ‘.csv’ in the end.
- Once the file is saved, go to your Nest account and upload the file again from the exception schedule that is created.
Making contributions - invalid reason code
You can check the member’s current payment source and group from ‘Manage workers’ page of your Nest account.
You’ll need to check future schedules individually for the member by opening the schedule from ‘Manage contributions’ page and clicking on ‘Options’ next to the member’s record, to confirm effective date and the schedule in which the change has been requested.
If the group or payment source change has been completed, you can check the details and the effective date from the message sent to your Nest secure mailbox.
If members’ group or payment source has been changed from a future date and there are no contributions to be paid in the schedule prior to effective change date, you can clear the schedule by submitting zero contribution.
If there are contributions to be paid in the old schedules prior to the group or payment source effective change date you can pay them by creating an exception schedule and clear the old schedules with zero contribution.
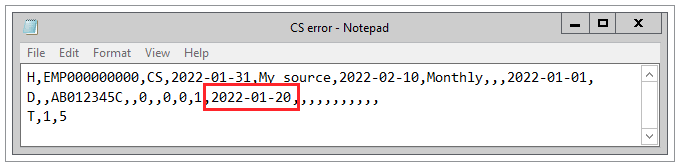
The effective date of partial or non-payment of contributions for a member can’t be earlier than the member’s enrolment date. For example, if the member was enrolled on 31 January 2022, you cannot enter 20 January 2022 as the effective date of partial or non-payment of contributions. To check the member’s enrolment date click ‘Manage workers’ on your Nest homepage. You’ll be able to view the enrolment date next to the member’s name.
Follow the below steps to change the effective date of partial or non-payment of contributions:
- Right click from your mouse on the file you want to upload, click ‘Open with’ and select ‘Notepad’.
- You’ll need to update the effective date for the worker in the respective row which starts with D.
- Update the effective date to a date which is later than the enrolment date.
- Then click ‘File’ and select ‘Save as’, enter a new name for the file and add ‘.csv’ in the end.
- Once the file is saved, go to your Nest account and upload the file again.
You’ll need to enter a reason for partial or non-payment of contributions in the schedule from ‘Manage contributions’ page of your Nest account. If the member did not earn enough to pay contributions, you can select the reason as ‘Member has insufficient earnings’. If the member has been made redundant, left their job or asked you to stop their contributions, you can select the reason as ‘No further contributions payable’.